基于xNode构造的蓝图方案

  欢迎参与讨论,转载请注明出处。

前言

  经历两月的上海疫情风波,过完了一个毫无实感的五一假期后蓦然回首今年居然还没写博客。恰好现有的一套方案也刚好历时半年以上的验证了,也到了该分享的时候了,也作为Gameplay相关分享的回归开幕。
  有过Gameplay相关经验的朋友应该对于业务开发流程都有自己的一套,每个项目可能都不尽相同。相比的《DFQ》的纯代码硬磕、相关参数读取配置的方案,《拉维瓦纳》选择的是导出关键API、围绕蓝图组织逻辑与数据的方案。这样不仅存在让策划深度参与的可能性、也使得逻辑与数据的隔阂被打破——甚至可以说蓝图就是一种具有逻辑表达能力的数据
  为此我们起先选择了FlowCanvas作为蓝图的解决方案,如果只是如此的话倒也没什么可说的。经过技术性Demo发布后,随着日益增长的需求,FlowCanvas凸显出其在性能方面的不足。主要体现在创建蓝图时的开销较大,且存在居高不下的GC Allow,再结合源码复杂度高难以修改、编辑器与运行时捆绑较强等问题,于是乎决定自己造了个轮子:xNodeGraph

0
1

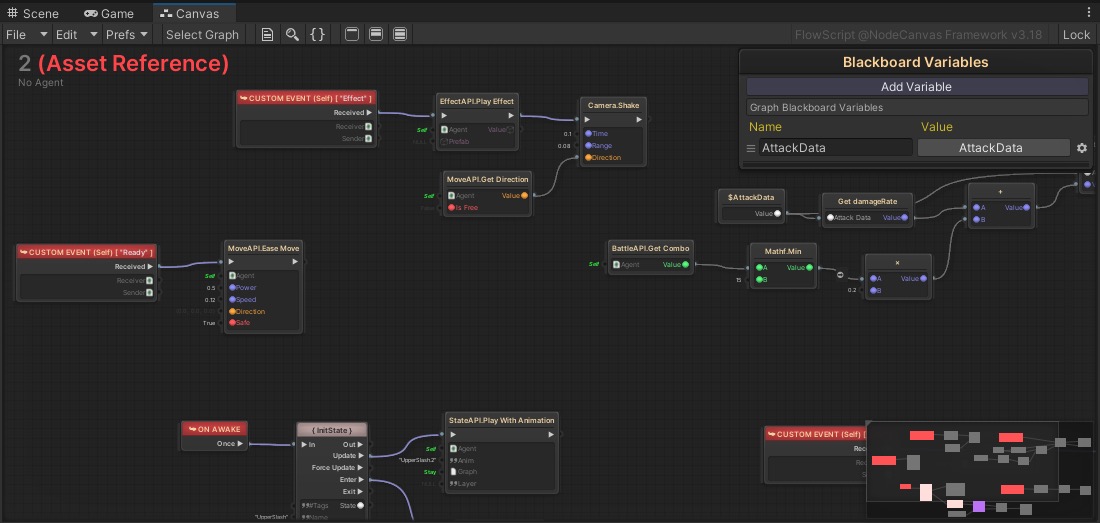
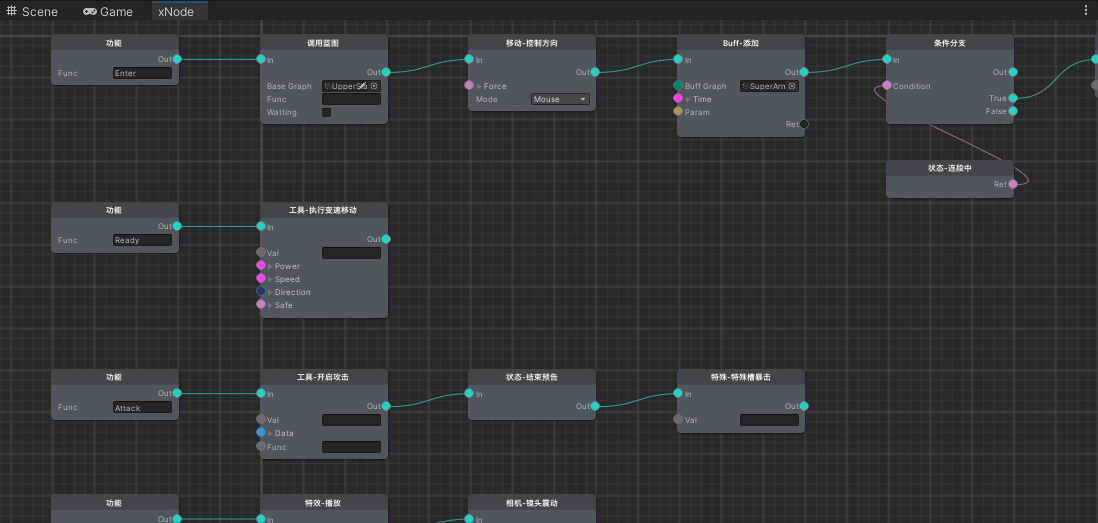
  以上两图分别为FlowCanvas与xNodeGraph对同一业务的对比,可以看出后者除却支持中文、摆的好看了点,大体上是大差不差的。然而FlowCanvas作为商业销售的插件,在功能上是大而全的。而我们实际上用不到那么多功能,只保证满足核心需求即可:

  • 一款能够编辑节点、组织数据结构的编辑器
  • 一款简洁高效、提供蓝图资源即可运作的运行时
  • 提供便捷的API导出节点的方案

  如此,基于一款基于xNode作为节点编辑器、自行编写运行时及相关工具链的解决方案便呼之欲出了。
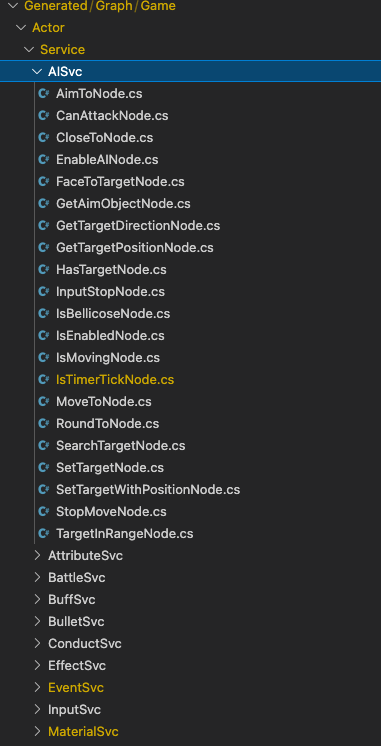
xNode & Odin

xNode

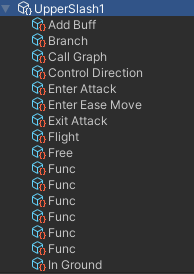
  入上图所示,xNode是一款纯粹的节点编辑器解决方案,并且你可以在不修改源码的前提下高自由度地定制界面形式。且定义了节点数据最基本的抽象(Graph、Node),并将它们组织了起来。在Unity的层面来说就是一个个ScriptableObject

2

  说到界面定制,就不得不提xNode的好搭档Odin了。多数情况下无需编写IMGUI是它最大的优势,但这并非我要引入的重点。关键在于Odin本身集成一些成熟的界面形式且xNode本身与之结合良好:

3

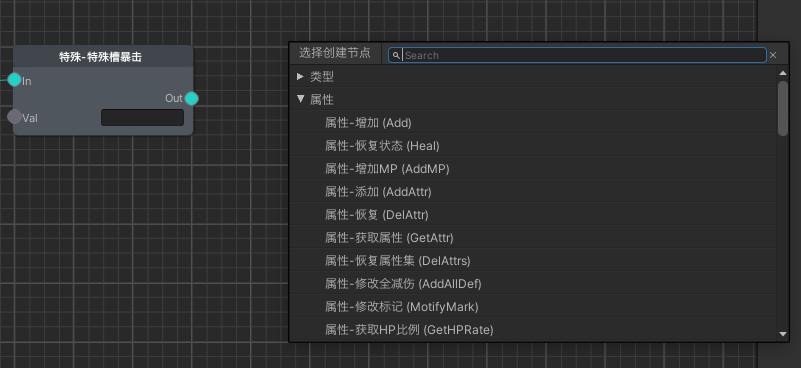
  如上图的节点选择菜单便是使用Odin自带的GenericSelector实现的。当然使用Odin与否在某些团队是个路线之争,这个便因地制宜了。

数据流 or 代码流

  说完界面部分,便到了运行时的首要抉择:蓝图的最终运行形式是怎样的?关于这块的方案业界有不少实现:有类似虚拟机运行节点触发逻辑的、有将蓝图转换为Lua代码的、有直接生成C#代码的(致天国的Bolt2)、甚至还有UE那般虚拟机与代码生成都提供的。
  xNodeGraph最终选择了虚拟机方案,最核心的原因是蓝图的部分并非性能热点,用虚拟机也可以接受。且真正实现了一种具有逻辑表达的资源,若是代码生成还要多一层转换。
  在决定了虚拟机方案后,我决定在xNode的节点数据结构上直接填充逻辑,这虽然不太优雅(运行时与xNode绑定了),但我不想整太多抽象转换之类的事了,反正xNode本身足够轻量:

1
2
3
4
5
6
7
8
9
10
11
12
13
14
15
16
17
18
19
20
21
22
23
24
25
26
27
28
29
30
31
32
33
34
// LogNode.cs
[CreateNodeMenuAttribute("调试输出")]
public class LogNode : FlowNode {
public override string Title {
get {
return "调试输出";
}
}
public override string Note {
get {
return @"打印输出结果";
}
}
[Input(connectionType = ConnectionType.Override)]
public string value;
private BaseNode valueNode;
protected override void Init() {
base.Init();
this.valueNode = this.GetPortNode("value");
}
// 核心逻辑函数
public override object Run(Runtime runtime, int id) {
var value = this.GetValue<object>(this.value, this.valueNode, runtime);
Debug.Log(value.ToString());
return null;
}
}

  以上是最简单的调试输出节点的代码实现,如此也能看出这套虚拟机运行时的本质便是调用一个个节点对象的Run函数以实现逻辑驱动。

运行时

  从上文代码也能看出节点运行逻辑时有着名为runtime的参数,那便是驱动蓝图运行的对象,我们可以在需要运作蓝图的地方创建runtime对象,还可传递一些变量进去供蓝图使用:

1
2
3
4
5
6
7
8
9
10
11
12
13
14
// GraphBehaviour.cs
public class GraphBehaviour : MonoBehaviour {
public BaseGraph graph;
public BlackBoard blackBoard;
private Runtime runtime;
protected void Awake() {
this.runtime = new Runtime(this.graph, this.blackBoard);
this.runtime.SetVariable("gameObject", this.gameObject);
this.runtime.RunFunc("Awake");
}
}

  如代码所示,这便是在一个MonoBehavior的基础上通过外部提供的蓝图资源创建运行时,并将自身的gameObject作为变量传递到了蓝图,最终调用蓝图内定义的Awake函数,将gameObject输出:

4

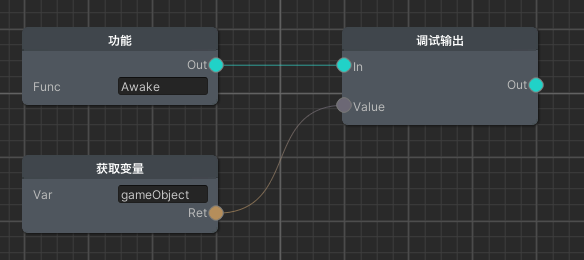
  从上述例子也能大致看出运行时除了根据Func作为入口点按序调用节点之外,还包括变量的存储、以及避免提供数据的节点反复运算的缓存,对于需要重复进行新计算的结果的节点,选择复制多一份节点即可:

1
2
3
4
5
6
7
// Runtime.cs
public class Runtime {
private BaseGraph graph;
public Dictionary<BaseNode, object> cache;
public Dictionary<string, object> variable;
}

  从上文节点可看出节点分为供应节点与流程节点,流程节点具有InOut两个插槽,而供应节点则必定有返回值插槽(否则就没有意义了)。流程节点也可以有返回值插槽,而且由于缓存机制的原因不会导致重复调用。

1
2
3
4
5
6
7
8
9
10
11
12
13
14
15
16
17
18
19
20
21
22
23
24
25
26
27
28
29
30
31
32
33
34
35
// Runtime.cs
public void RunNode(BaseNode node, int id) {
// 判断当前流程是否已执行完毕
if (this.exitIdSet.Contains(id) || this.IsExit) {
return;
}
// 调用节点的核心逻辑
node.Run(this, id);
// 获取Out插槽指向的In插槽节点
var next = node.NextNode;
if (next) {
this.RunNode(next, id);
}
}
// BaseNode.cs
public T GetValue<T>(T value, BaseNode node, Runtime runtime) {
if (node) {
// 判断缓存内是否有该节点的返回值
if (runtime.cache.ContainsKey(node)) {
return (T)runtime.cache[node];
}
// 调用核心逻辑获得数据,并在核心逻辑内将返回值数据缓存
return (T)node.Run(runtime, 0);
}
// 若是该值来源不通过节点则使用自身数据
return value;
}

  从上述代码还可看出有着名为id的参数,且它与判断流程是否执行完毕有关。在同步执行下这本来应该不是问题,毕竟整个流程的执行过程都是阻塞的,不过一口气执行到结尾罢了,根本没有判断的必要。这显然是为了异步的情况而生的:

1
2
3
4
5
6
7
8
9
10
11
12
13
14
15
16
17
18
19
20
21
22
23
24
25
26
27
28
29
30
31
32
33
34
35
36
37
38
39
40
41
42
43
44
45
46
47
48
49
50
51
52
53
54
55
// Runtime.cs
private HashSet<int> exitIdSet;
// 异步执行函数
public async Task RunFuncWaitting(string func, int id=0, BaseGraph graph=null) {
graph = graph == null ? this.graph : graph;
if (!graph.funcMap.ContainsKey(func)) {
return;
}
var f = graph.funcMap[func];
id = id > 0 ? id : func.GetHashCode(); // 若未提供id,则使用func名称的哈希码
if (id > 0 && this.exitIdSet.Contains(id)) {
this.exitIdSet.Remove(id);
}
// 根据该流程是否为异步决定执行
if (f.async) {
await this.RunNodeAsync(f.node, id);
}
else {
this.RunNode(f.node, id);
}
}
// RunNode的异步版
public async Task RunNodeAsync(BaseNode node, int id=0) {
if (this.exitIdSet.Contains(id) || this.IsExit) {
return;
}
// 调用节点的逻辑函数异步版
await node.RunAsync(this, id);
var next = node.NextNode;
if (next) {
await this.RunNodeAsync(next, id);
}
}
// 结束流程,将id登记到exitIdSet
public void ExitFunc(int id) {
if (id > 0) {
this.exitIdSet.Add(id);
}
}
// 当然也提供无id的版本
public void ExitFunc(string func) {
this.ExitFunc(func.GetHashCode());
}

  从上述代码可见,运行时使用的异步方案是C#的Async/Await,这套方案最大的缺点在于外部无法很方便的直接中断异步的执行,于是采用了通过id作为标识符的方式、逐节点检查的方式进行流程中断控制。
  由于异步传染的问题,每个节点都要实现对应的同步与异步两个版本函数(RunFunc/RunFuncAsync),每个Func节点会检查所属流程中是否含有异步节点(这件事会在编辑器端进行并保存为数据,也就是前文提到的f.async),理论上可以只保留异步版本也没关系,但实际测试下来异步的调用堆栈会比同步的要深以及略微的GC Allow,为了提升一点性能故选择了分离的做法。

1
2
3
4
5
6
7
8
9
10
11
12
13
14
15
16
17
18
19
20
21
22
23
24
25
26
// LogNode.cs
// Log节点的异步版本
public async override Task<object> RunAsync(Runtime runtime, int id) {
var value = await this.GetValueAsync<object>(this.value, this.valueNode, runtime);
Debug.Log(value.ToString());
return null;
}
// BaseNode.cs
// 获取数据的异步版
public async Task<T> GetValueAsync<T>(T value, BaseNode node, Runtime runtime) {
if (node) {
if (runtime.cache.ContainsKey(node)) {
return (T)runtime.cache[node];
}
var v = await node.RunAsync(runtime, 0);
return (T)v;
}
return value;
}

节点生成

  从上述LogNode可以看出复杂度还是有不少的,一些特殊节点倒也罢了,若是每个节点都如此手写那可真是太手工业了。于是乎节点代码生成势在必行:

1
2
3
4
5
6
7
8
// Math.cs
public static class Math {
[Node("数学-向量相加", "a + b", false)]
public static Vector3 AddVec(Vector3 a, Vector3 b) {
return a + b;
}
}

  节点生成需要对函数做标记,那么使用C#的Attribute特性便很自然了,通过提供函数的节点名称、说明、是否为流程节点自动生成类文件:

1
2
3
4
5
6
7
8
9
10
11
12
13
14
15
16
17
18
19
20
21
22
23
24
25
26
27
28
29
30
31
32
33
34
35
36
37
38
39
40
41
42
43
44
45
46
47
48
49
50
51
52
53
54
55
56
57
58
// Generated/Graph/Game/Lib/Math/AddVecNode.cs
namespace Generated.Graph.GGame.Lib.Math_ {
[CreateNodeMenuAttribute("数学-向量相加")]
public class AddVecNode : BaseNode {
public override string Title {
get {
return "数学-向量相加";
}
}
public override string Note {
get {
return "a + b";
}
}
public override bool Async {
get {
return false;
}
}
[Input(connectionType = ConnectionType.Override)]
public Game.Graph.Vec3 a;
private BaseNode aNode;
[Input(connectionType = ConnectionType.Override)]
public Game.Graph.Vec3 b;
private BaseNode bNode;
[Output]public Game.Graph.Vec3 ret;
protected override void Init() {
base.Init();
this.aNode = this.GetPortNode("a");
this.bNode = this.GetPortNode("b");
}
public override object Run(Runtime runtime, int id) {
var a = this.GetValue<Game.Graph.Vec3>(this.a, this.aNode, runtime);
var b = this.GetValue<Game.Graph.Vec3>(this.b, this.bNode, runtime);
this.ret.value = Game.Lib.Math.AddVec(a.value, b.value);
return this.ret;
}
public async override Task<object> RunAsync(Runtime runtime, int id) {
var a = await this.GetValueAsync<Game.Graph.Vec3>(this.a, this.aNode, runtime);
var b = await this.GetValueAsync<Game.Graph.Vec3>(this.b, this.bNode, runtime);
this.ret.value = Game.Lib.Math.AddVec(a.value, b.value);
await Task.CompletedTask;
return this.ret;
}
}
}

  这生成的还挺人模狗样的,原理倒也不复杂,便是通过在菜单点击代码生成的按钮后,遍历所有标记了NodeAttribute的函数,通过反射API获取函数的各项属性(名称、返回值、参数、是否异步等),基于代码模板生成文件即可:

5

1
2
3
4
5
6
7
8
9
10
11
12
13
14
15
16
17
18
19
20
21
22
23
24
25
26
27
28
29
30
31
32
33
34
35
36
37
38
39
40
41
42
43
44
45
46
47
48
49
50
51
52
53
54
55
56
57
58
59
60
61
62
63
64
65
66
67
68
69
70
71
72
73
74
75
76
77
78
79
80
81
82
// GenerateNodes.cs
public static class GenerateNodes {
private const string CODE = @"using System.Threading.Tasks;
using Game.Graph;
namespace Generated.Graph.{Namespace}_ {
[CreateNodeMenuAttribute('{Title}')]
public class {ClassName} : {ParentNode} {
public override string Title {
get {
return '{Title}';
}
}
public override string Note {
get {
return '{Note}';
}
}
public override bool Async {
get {
return {Async};
}
}
{Defines}
protected override void Init() {
base.Init();
{Init}
}
public override object Run(Runtime runtime, int id) {
{Call}
return {ReturnRun};
}
public async override Task<object> RunAsync(Runtime runtime, int id) {
{CallAsync}
return {ReturnRun};
}
}
}
";
// 类型转换映射
public static Dictionary<Type, Type> TypeMapping = new Dictionary<Type, Type>() {
{typeof(System.Single), typeof(Number)},
{typeof(System.Int32), typeof(Number)},
{typeof(System.Boolean), typeof(Bool)},
{typeof(UnityEngine.Vector3), typeof(Vec3)},
{typeof(UnityEngine.Quaternion), typeof(Quat)},
{typeof(System.Object), typeof(Obj)},
{typeof(UnityEngine.Color), typeof(Col)},
};
[MenuItem("Tools/Generate Nodes")]
public static void Menu() {
ClearFolder();
Generates();
EditorUtility.RequestScriptReload();
}
private static void Generates() {
var types = typeof(NodeAttribute).Assembly.GetExportedTypes();
foreach (var t in types) {
var methods = t.GetMethods(BindingFlags.Static | BindingFlags.Public);
foreach (var m in methods) {
var attr = m.GetCustomAttribute<NodeAttribute>();
if (attr != null) {
GenerateNode(t, m, attr);
}
}
}
}
}

  当然注意某些变量类型要转换为对应的形式,这个下文会详解原因。

变量与黑板

  从上文代码看得出,由于通用性问题,变量的传递需要通过转换为object类型进行传递。而值类型涉及与object的互转时会出现装箱拆箱成本,导致GC Allow,这个是需要避免的。所以专门为一系列用到的值类型实现了对应的包装:

1
2
3
4
5
6
7
8
9
10
11
12
13
14
15
16
17
18
19
20
21
22
23
24
25
26
27
// Variable.cs
public class Variables<T> {
public T value;
public override string ToString() {
return this.value.ToString();
}
}
[Serializable]
public class Obj : Variables<object> {}
[Serializable]
public class Number : Variables<float> {}
[Serializable]
public class Bool : Variables<bool> {}
[Serializable]
public class Vec3 : Variables<Vector3> {}
[Serializable]
public class Col : Variables<Color> {}
[Serializable]
public class Quat : Variables<Quaternion> {}

  这也是上文提到节点代码生成时要进行类型转换的原因,如此基本避免了运行时会产生GC Allow,相关数据都聚集在蓝图资源上,没有即时创建的情况(哪怕返回值也是提前创建好了)。唯一需要注意的是在外界传变量的时候要使用包装类型:

1
this.runtime.SetVariable("count", new Number() {value = 3});

  说完变量部分再来聊聊黑板(Blackboard),这个词源于FlowCanvas,意思是变量配置池:

6

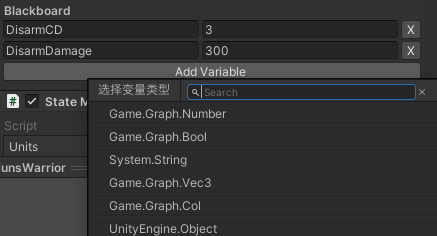
  这玩意的实现非常粗暴,把诸类型堆砌一块就完事了:

1
2
3
4
5
6
7
8
9
10
11
12
13
14
15
16
17
18
19
20
21
22
23
24
25
26
27
28
29
30
31
32
33
34
35
36
37
// Blackboard.cs
[Serializable]
public class Blackboard {
[Serializable]
public class Unit {
public string type;
public string name;
public Number number;
public Bool boolean;
public string text;
public Vec3 vec3;
public Col col;
public Object obj;
public object GetValue() {
if (this.type == typeof(Number).ToString()) {
return this.number;
}
else if (this.type == typeof(Bool).ToString()) {
return this.boolean;
}
else if (this.type == typeof(string).ToString()) {
return this.text;
}
else if (this.type == typeof(Col).ToString()) {
return this.col;
}
else if (this.type == typeof(Vec3).ToString()) {
return this.vec3;
}
return this.obj;
}
}
public Unit[] values;
}

  黑板可在运行时创建时传参,这个在上文也有体现,在运行时将会把黑板的数据批量赋值为变量:

1
2
3
4
5
6
7
8
9
10
11
12
// Runtime.cs
public void SetBlackboard(Blackboard blackboard) {
if (blackboard == null || blackboard.values == null) {
return;
}
foreach (var unit in blackboard.values) {
var value = unit.GetValue();
this.SetVariable(unit.name, value);
}
}

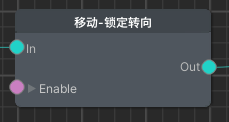
  变量的用途可谓相当广泛,除了在蓝图层面的获取/设置之外,还可以在函数登记时标记哪些参数会自动调用对应变量,减少连线的复杂度:

1
2
3
4
[Node("移动-锁定转向", "锁定移动时的方向切换", true, "body")]
public static void LockTurn(Body body, bool enable) {
body.lockTurn = enable;
}

  如上代码的body参数便会自动获取名为body的变量,无需填写:

7

  除此之外还可以在函数直接与变量交互,实现通过变量名达到索引的效果,减少连接复杂度:

1
2
3
4
5
6
7
8
9
10
11
12
13
14
15
16
17
[Node("工具-创建定时器", "创建定时器,使用名称登记,可选择填写时间结束后的功能名", true, "rt")]
public static void NewTimer(Runtime rt, string val, string func) {
var timer = new Timer();
rt.variable[val] = timer;
if (func != "") {
timer.Func = () => {
rt.RunFunc(func);
};
}
}
[Node("工具-启动定时器", "启动定时器,填写时间与是否循环", true, "rt")]
public static void EnterTimer(Runtime rt, string val, float time, bool isLoop) {
var timer = rt.variable[val] as Timer;
timer.Enter(time, null, isLoop);
}

后记

  目前这套方案对于子蓝图(有明确的输入输出)的支持还不算完善,只支持正常的跨蓝图函数调用,但对于现状而言也算够用了。这就是造非普世的轮子的局限性,只满足自我的需求便足矣。故而这份实现仅供参考,不推荐直接使用(除非你的需求也完美贴合)。另外也感谢秃头鼓励师、烟雨迷离半世殇提供的相关参考与支持。