欢迎参与讨论,转载请注明出处。
前言
转眼间到了十月,再不写点东西都不会写了。正好现在《拉维瓦纳》的新动画方案也算经过将近一年的验证,可以拿出来分享一二了。本文所称的动画皆属Unity下的AnimationClip,在阅读本文之前建议对Playable API与蓝图有一定的了解,那么事不宜迟这就开始!
首先第一个问题,好好的Animator方案放着不用搁那造轮子是要干什么玩意?
Animator本身的功能是基本完备的,需要的功能(动画播放、速度控制、分层混合、动画过渡)都有,但存在如下问题:
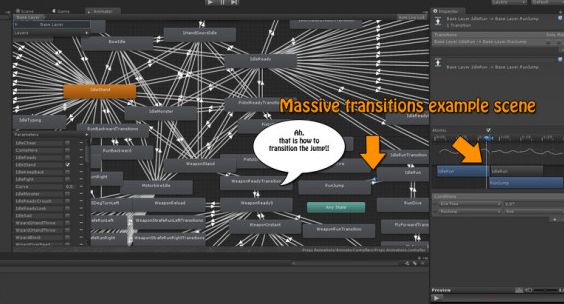
- 所有动画信息、动画之间的过渡关系都需要集中配置,且继承功能羸弱,缺乏灵活性,极端情况下会呈现蜘蛛网:
- Animator的Update无法很舒服的控制,虽然提供了[Animator.Update(https://docs.unity.cn/cn/current/ScriptReference/Animator.Update.html)]方法,但想精准控制还需通过调控[Animator.speed](https://docs.unity.cn/cn/current/ScriptReference/Animator-speed.html)实现
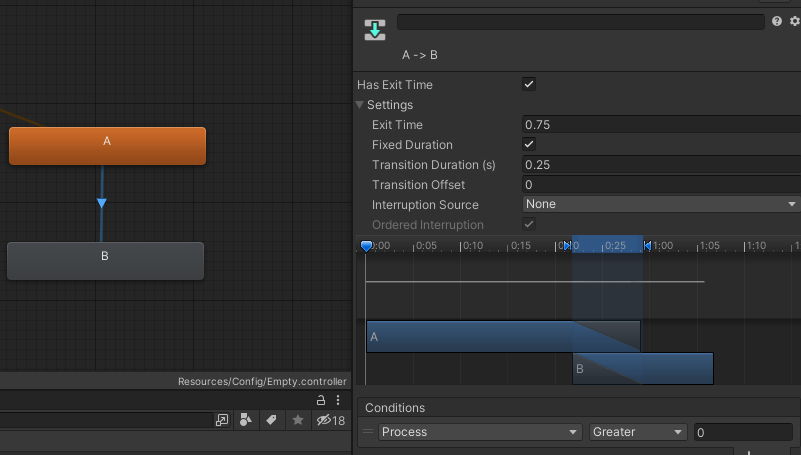
- 若想符合Animator预设动画之间的过渡效果,需让Animator自行驱动动画状态切换,而非手动调用Animator.Play,对于一些条件切换还需通过AnimatorControllerParameter进行,这使得Animator的状态机运作是独立于逻辑运行的,存在一定的不可控性:
基于上述原因,虽然捏着鼻子用也不是不行,但Unity也自知理亏,推出了可定制性更强的动画方案——Playable API
Playable API
Playable API基于动画的用例可参考这篇文章,本质上它是一种混合器(根据多种数据输入源组织混合输出结果)的树,只是Unity官方实现了关于动画与音效的各项驱动器,从而使得我们可以实现更具可控性的动画方案: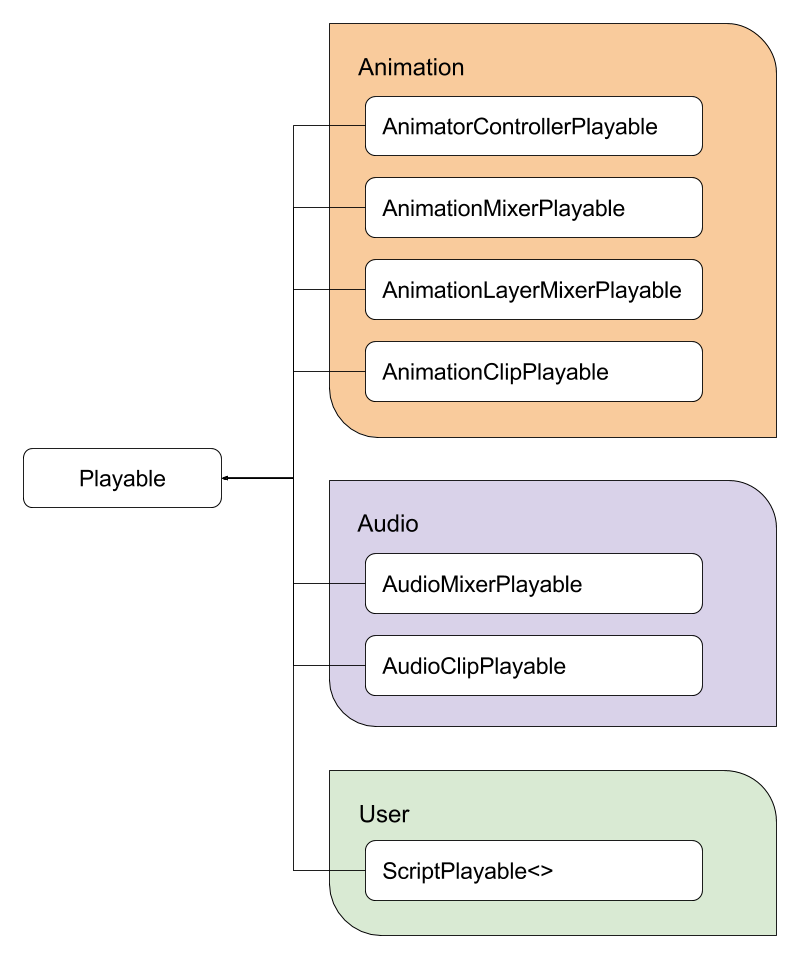
Playable API如其名般,就是一系列API提供的数据结构,通过调用它们进行数据的组织,最终输出结果:
|
|
以上代码示例展示了最简单的Animation Playable用法——为当前GameObject播放一个AnimationClip动画,若安装了PlayableGraph Visualizer扩展包,还可通过菜单栏Window/Analysis/PlayableGraph Visualizer打开Playable预览窗口,在运行时点击GameObject即可看到具体的构造: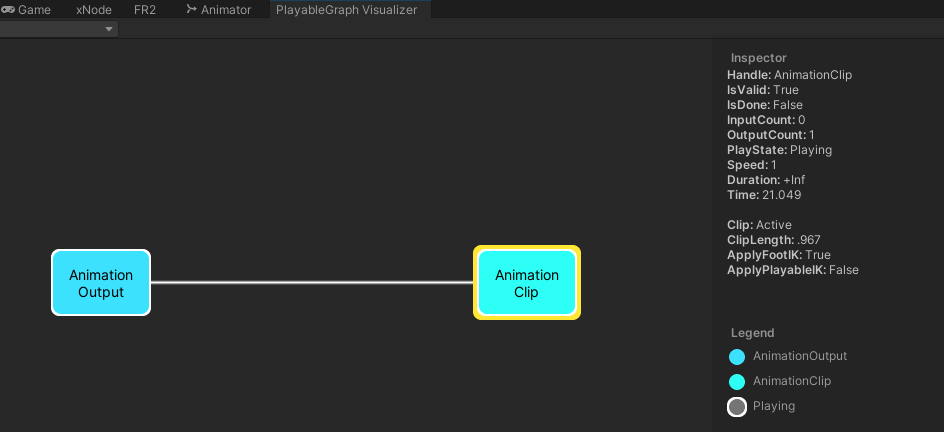
如前图所示,动画相关的Playable类还有很多(AnimationMixerPlayable、AnimationLayerMixerPlayable),足以实现我们需要的基本功能:
- 播放AnimationClip动画(利用AnimationClipPlayable)
- 按权重混合两个动画结果,实现混合树以及动画过渡(利用AnimationMixerPlayable)
- 设置AvatarMask,实现分部位与叠加动画(利用AnimationLayerMixerPlayable)
下图便是一套实际项目运作的Playable图结构,表示两个部位(身体、部件)运作、且实现了动画过渡(所以分别有两个AnimationClip节点,表示新旧):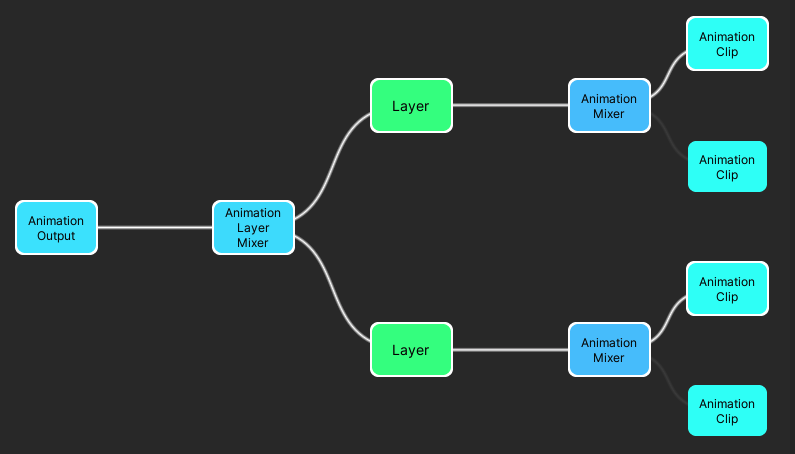
由此可见Playable API在功能上是能够满足需要的,但直接这样吭哧吭哧的直接写肯定是不行的,所以要基于此构思出一套新的工作流,实现其对应的封装。
动画蓝图
若是论对Playable API的动画封装方案,Animancer倒是一个不错的选择。该有的功能都有了,还有相关编辑器配套。但最终还是没有选用,原因系Animancer无法直接嵌入我设想的工作流中,且尚需加一些特色功能,这表示需要做一定的改动。最重要的一点在于:自己重新封装一套的成本并不高,那既然都要折腾,不妨大干一场了!
封装方案的具体细节后续再说,先来看看成品的使用情况: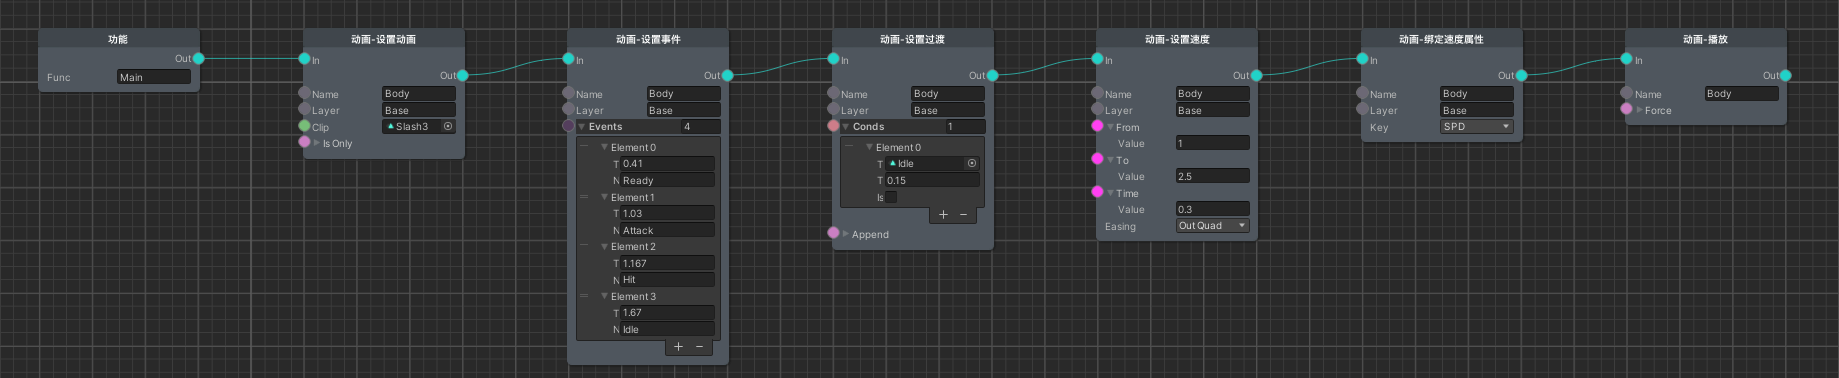
可以看出这是一段基于xNode的蓝图方案构造的动画配置过程,讲述的是身体本体为播放名为Slash3的动画而做的一系列准备,包括动画帧事件、与Idle动画的切换过渡、速度曲线变化、绑定攻速属性等。从资源图标可以看出,这里的动画资源都是AnimationClip,而非什么名称索引,达到了要播什么就上什么的效果,无需像Animator集中配置。这样一段节点过程将会存成单独的蓝图文件,我称之为动画蓝图,以供所需之处调用。
从动画蓝图的参数配置可以看出,它是支持多个播放实体与多个部件的,虽然上图只是展示了Body实体下的Base层。但由此可见肯定会有登记具体GameObject为实体的方式: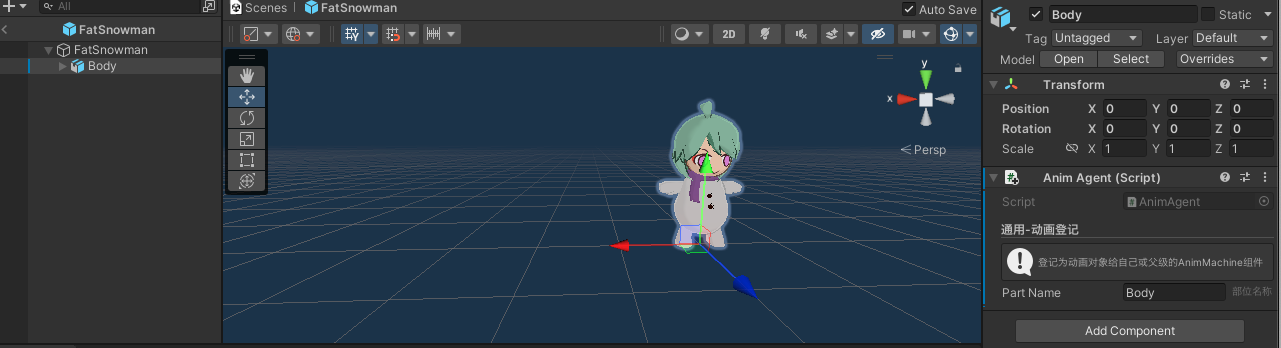
如此便将小雪人的本体模型登记为名为Body的动画实体了,但由此可以看出还是不够的,必定还有个统一管辖动画的组件: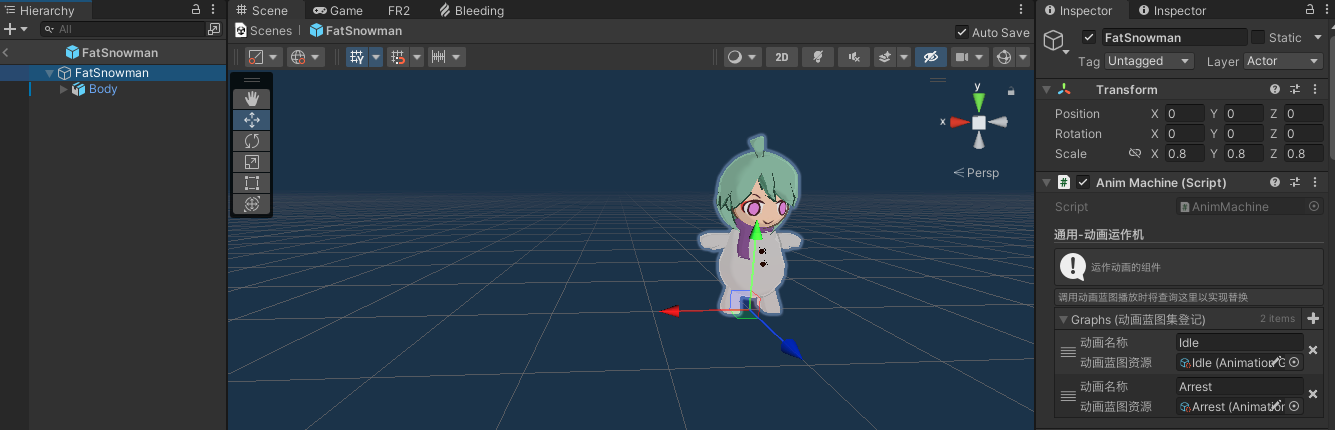
通过挂载Anim Machine组件提供功能,然后在各处挂载Anim Agent作动画实体登记,再佐以动画蓝图驱动,这便是我的动画工作流!这套方案较之Animator有个很大的优势:它统一管辖了各个动画部件,将多个部件在一套管理模式下统一运作,在业务层封装成动画蓝图的形式,实现了想播什么就播什么的效果。当然动画蓝图针对的都是具体的AnimationClip,若是想实现同一套逻辑下不同单位播放不同动画的话,还可以在Anim Machine组件登记专属的动画蓝图,也就是这个部分: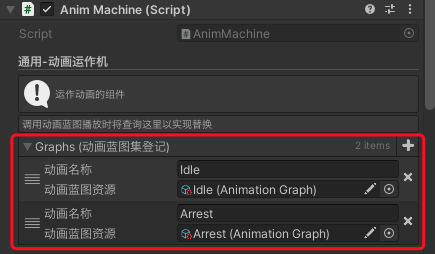
这时候便如同Animator那般通过名称做了一层映射,在实际调用动画蓝图时会填写名称查找登记,若登记存在对应动画蓝图则调用登记版本的,否则为节点参数的: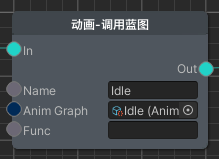
新的动画工作流方案便这么点内容,我们再回顾一下上文提到的Animator缺点,看看解决情况如何:
- 所有动画信息、动画之间的过渡关系都需要集中配置,且继承功能羸弱,缺乏灵活性,极端情况下会呈现蜘蛛网
- 解决,动画信息无需集中配置,以动画蓝图的形式配置,想播谁调谁
- 动画之间的过渡关系针对每个动画单独配置,而非蜘蛛网的形式(当然这点也许各有利弊)
- 继承功能通过在Anim Machine组件登记,调用蓝图时通过名称映射实现替换
- Animator的Update无法很舒服的控制,虽然提供了Animator.Update方法,但想精准控制还需通过调控Animator.speed实现
- 解决,Playable Graph可手动Update,与主逻辑严丝合缝
- 若想符合Animator预设动画之间的过渡效果,需让Animator自行驱动动画状态切换,而非手动调用Animator.Play,对于一些条件切换还需通过AnimatorControllerParameter进行,这使得Animator的状态机运作是独立于逻辑运行的,存在一定的不可控性
- 解决,动画蓝图记录了针对其他动画的过渡方案,播了就有过渡,不存在独立运作的动画控制流程,按业务层严格控制
- 除此之外,新方案还统一管辖了多个动画实体,让业务层无需过多操心,并根据业务需求做出诸多扩展,属于根据项目实际情况做出的实践
封装构成
在聊具体的代码结构前我们先来看看Playable Graph的具体构成: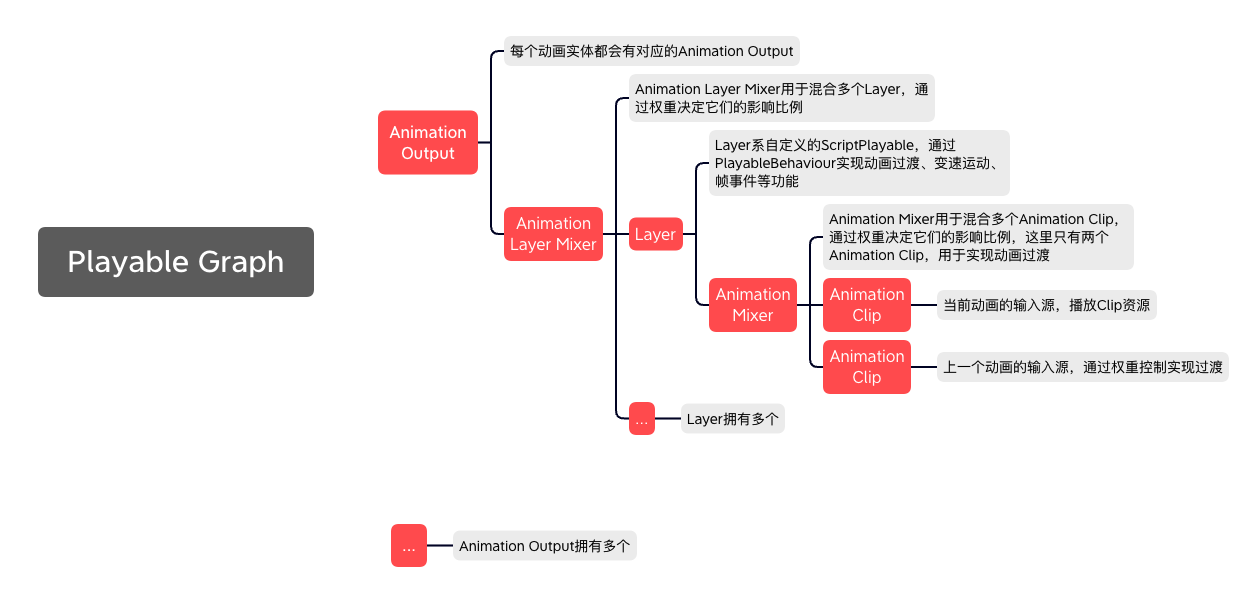
可以看出这套结构下LayerPlayable节点是基层的管理单元,表示一个动画实体下某层部位的动画运作,基本可以对应为Animator的Layer层。它负责管理新旧两个AnimationClipPlayable以及它们的混合器AnimationMixerPlayable以实现动画过渡的功能,外加动画过程相关的速度曲线变化以及帧事件功能。
在LayerPlayable之上便是AnimationPlayableOutput了,它代表着一个动画播放单元,对应着一个Anim Agent组件以及Animator组件。在一整套Playable Graph环境中可以有多个AnimationPlayableOutput,在一个Graph下统一运作。
接下来便到了具体的代码结构,接下来将以一张描述了核心数据结构的UML图展开具体的组成结构,这不代表全部的代码结构,但足以说清楚核心部分: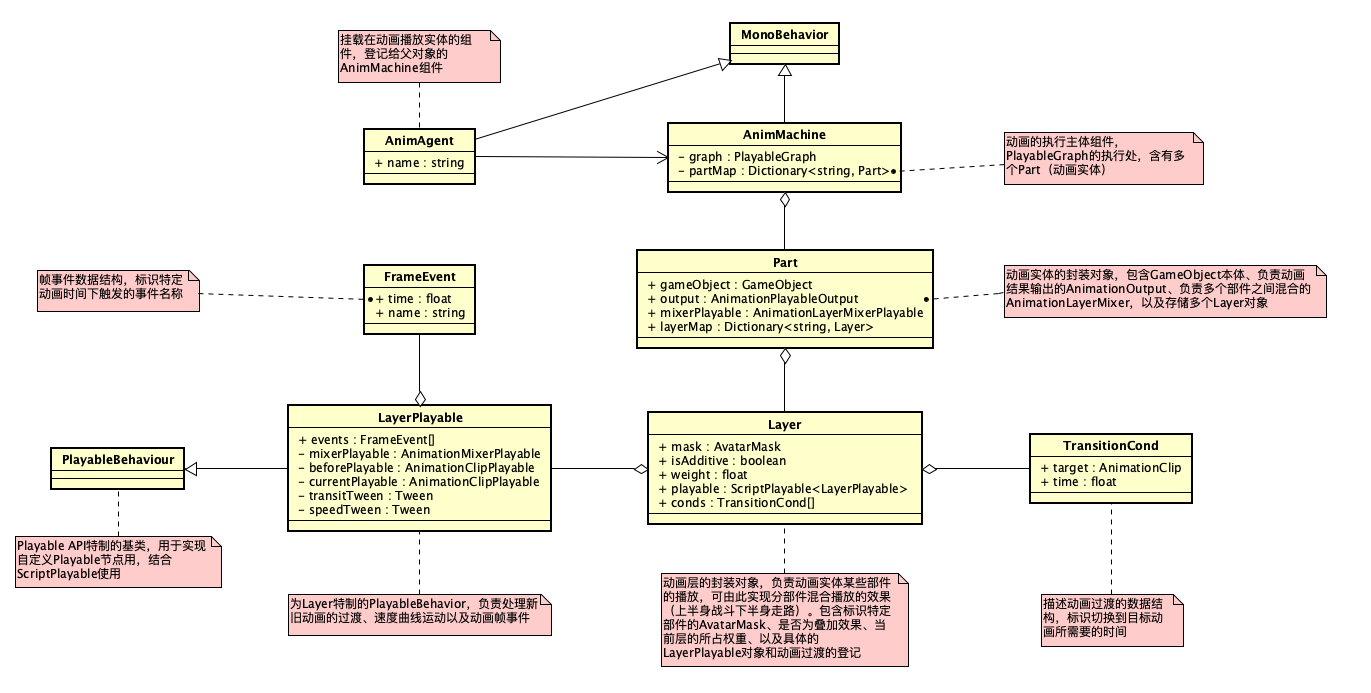
上图内容颇多,讲述了各个数据结构的基本成分与它们之间的关联。接下来将以具体的蓝图功能为引,牵引出相关种种。
设置动画
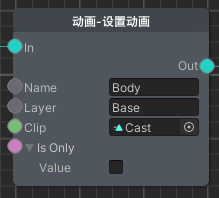
上图为动画功能节点中的核心成分:设置动画(SetClip)。从前文可知这套动画方案是类似图形API的设置若干状态后执行的,所以这里只是为指定的动画实体(Part)下的部件(Layer)设置将要播放的AnimationClip资源。这将是个穿针引线的好机会,以下为关键代码:
|
|
以上为AnimMachine层面的SetClip方法内容,大致便是做了Part与Layer的相关准备工作,创建了AnimationClipPlayable与获取动画过渡项,最后通过LayerPlayable驱动。那么接下来看看LayerPlayable.Play的内容:
|
|
上述代码中的Tween类型是未曾介绍的,不过有过相关动效经验的人士相信一眼便看出来是什么了:它可通过指定起始、目标值,经历时间,然后根据特定的插值模式实现富有曲线变化的插值效果: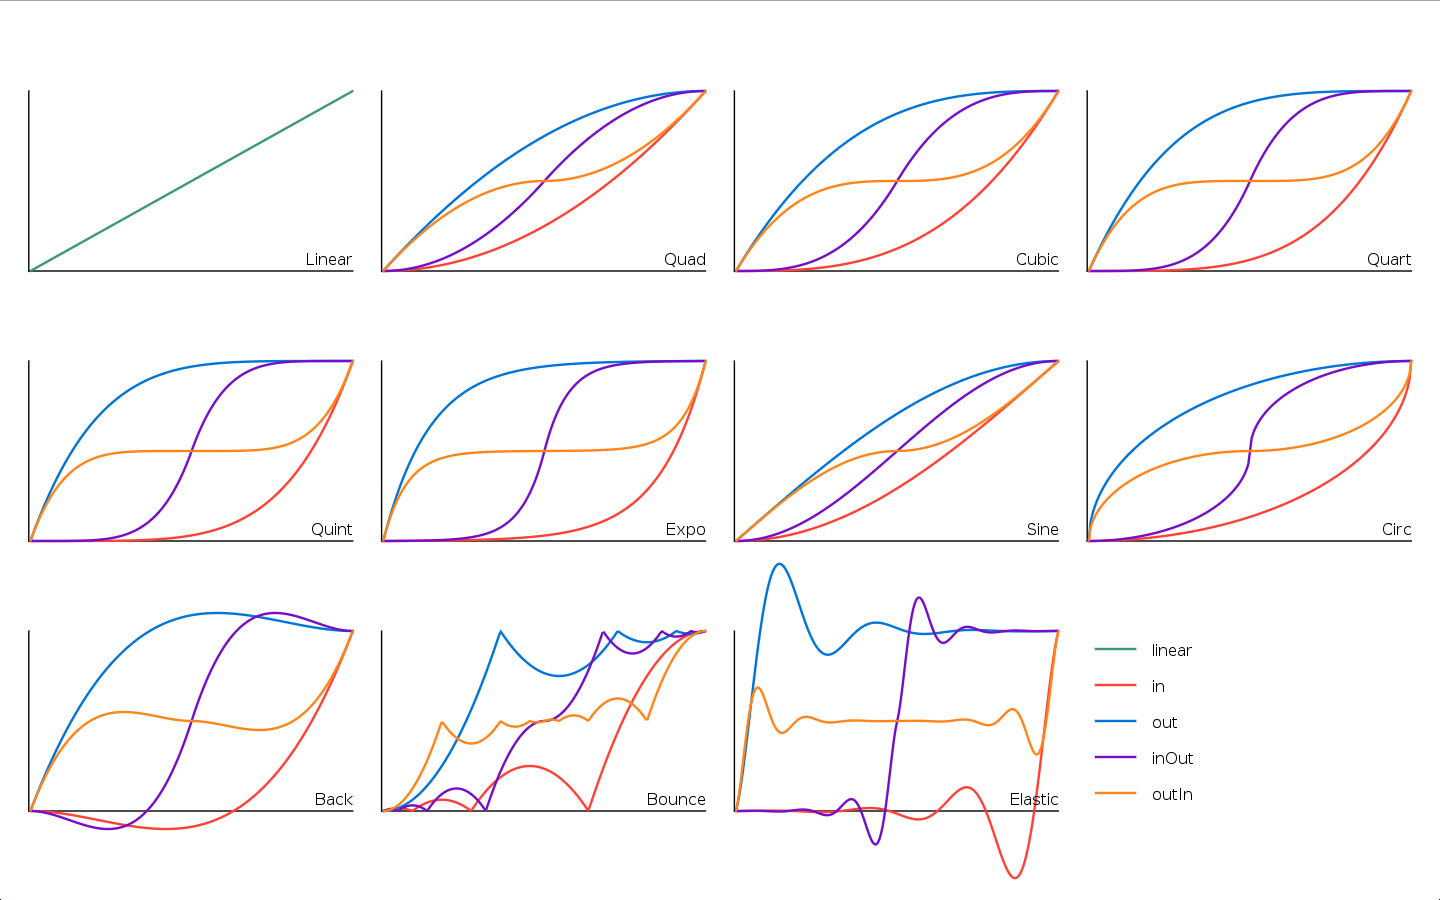
简而言之,便是能让动画速度与过渡效果更富有节奏变化的中间件。当然实际上过渡这块并没有用上特殊的插值模式,因为实践下来无甚区别。接下来正好将动画过渡这块展开讲讲——
动画过渡
在聊动画过渡之前,我们先来看看它到底是个啥:
重点关注攻击结束到恢复站立的那段动画过程,实际上它是由一个动画(Attack)过渡到了另一个动画(Idle):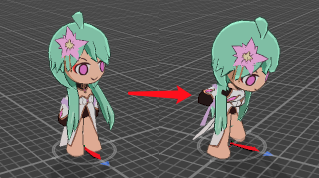
由于骨骼动画的本质是在一个个姿势之间插值,所以跨动画姿势插值自然是可以做到的。但不似一段动画过程中的姿势插值,跨动画的姿势插值没有明确的插值时间,且各种动画之间的插值效果也是不确定的。所以我们需要为此做出一套管理机制,这便是此节点的意义: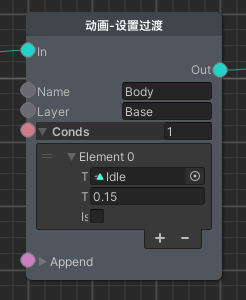
上图节点是在展示中的攻击动画蓝图里的,用途为当切换为Idle动画时,用0.15秒过渡过去,而切换到其他动画的话则是按默认过渡时间0.1秒进行,也可通过过渡项填空的方式指定默认过渡时间: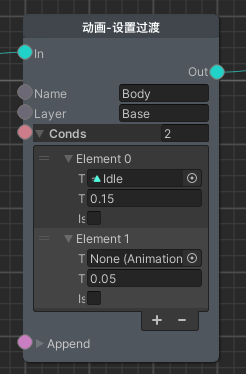
当然除了这种从动画自身考虑切换到其他动画的情况,还有一种是主动设定切换到本动画时的过渡时间: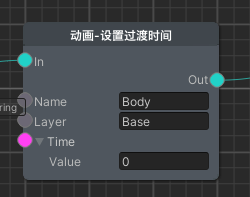
如上图般设置,当播放此动画时便会直接完成切换,没有过渡。在诸如挨打动画这种讲究蒙太奇效果的场合很合适:
如此可见,本套方案便是用这种离散式的节点设置替代了Animator的蜘蛛网,可谓有利有弊吧,但显然是更得我心的。接下来看看具体的代码实现:
|
|
可以看出AnimMachine部分并无什么重点,主要是根据AnimationClip搜索TransitionCond,还是看看关键的LayerPlayable吧:
|
|
上述代码主要是通过transitTween驱动mixerPlayable对新旧动画输入源的权重调整实现过渡效果,其中的重点在于Layer无Clip时的处理:通过调用上层传入的SetLayerWeight回调从而控制AnimationLayerMixerPlayable对当前Layer输入源的权重从而实现逐渐失效:
|
|
上述代码展示了Layer的创建过程,并引入了Part部分的mixerPlayable。可以理解为Layer层面下有个针对新旧动画之间的Mixer,Part层面下有个针对Layer之间的Mixer。而为了Layer是有序接入Part的Mixer的,还需为Layer设计两套容器存储(layerMap和layers)。既然已经引入到了Part,那么接下来关联性最大的节点为引展开讲讲吧——
播放
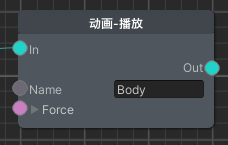
播放节点作为动画蓝图设置完毕后的执行命令,类似渲染管线里的CommandBuffer.Submit()——将先前设置的状态打包执行。当然与Submit一样,播放节点也不会立即执行生效,而是在之后的逻辑时机统一执行,除非你勾选了force参数:
|
|
可以看出,Play真正执行的内容便是构建part.mixerPlayable,Layer部分的Play内容已经在SetClip()时通过LayerPlayable.Play()完成了。将播放执行放在后续逻辑统一进行是为了业务的稳定性,也为特殊情况提供了force参数网开一面。
说道这份上,顺带再看看动画实体Part的初始化过程,以补全最后一块拼图吧:
|
|
专门功能
通过设置动画、动画过渡、播放三块,我们将整个动画方案的核心构成都梳理清楚了。接下来便是介绍在此之上的诸多功能了,与先前相同,也是通过蓝图节点为引进行介绍:
帧事件
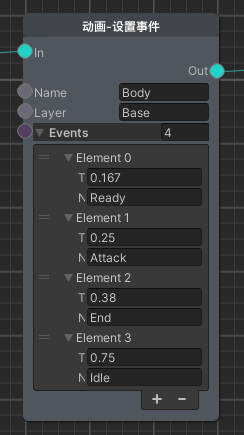
本动画方案并没有选择Unity为AnimationClip准备的AnimationEvent,而是选择自定义了一套帧事件方案:通过设置事件蓝图填写每个时间点触发的对应事件名,在动画执行到对应时间点时将调用回调函数通知外界对应事件触发。从编辑交互的角度来说可谓原始得很了,被AnimationEvent完爆。这一块确实没那么讲究,凑合了。
之所以不考虑AnimationEvent,有以下几点原因:
- 在某些极端情况下会跳帧,事件未触发
- 在动画过渡期间旧动画的事件依旧会执行
- 与动画播放强耦合了,不利于纯逻辑运行
- 不方便大规模编辑
- 底层事件调用性能不佳
于是自己造一套便势在必行了,当然对于使用Timeline制作流程业务的方案下就不需要了,因为Timeline本身便是帧事件触发。当然我并没有选择Timeline方案,所以帧事件也算是一种替代了。如上图所示般,那是一段攻击动画涉及的种种事件,之所以不是填写具体的动画帧数而是时间,首先是为能够让帧事件独立运作留个后门,其次是不同的AnimationClip的FPS是不一定一致的,从而会导致描述不稳定,且按帧作为时间刻度的话可能太大了(FPS较低)的话,这个问题在AnimationEvent很明显。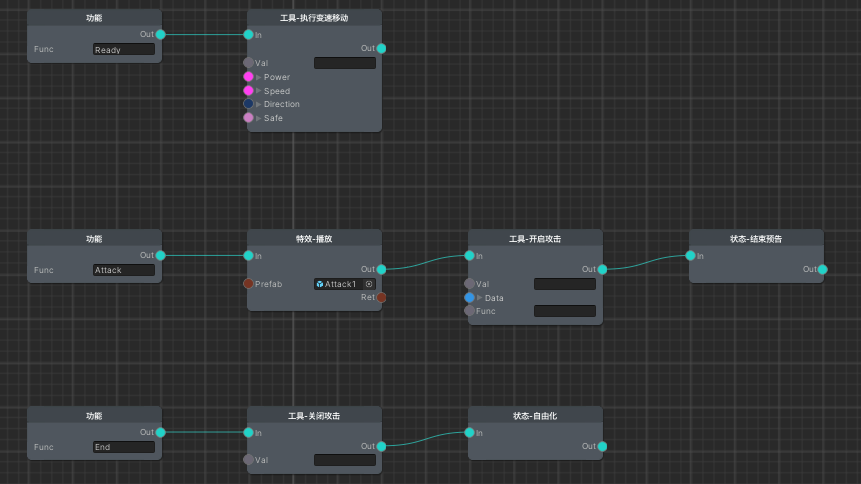
上图便是播放攻击动画的状态蓝图,可见便是在动画蓝图中登记的对应事件业务。状态机这边通过注册回调以获得动画事件的触发,从而调用状态蓝图中对应的功能,实现动画驱动逻辑的效果。
|
|
然后便到代码环节了,AnimMachine部分无甚出奇的内容,就是个对应设置事件的蓝图节点,还是看看重点部分吧:
|
|
可以看出帧事件的实现相当简单,主要注意动画速度过快时跳帧也不要漏过事件即可。由于《拉维瓦纳》是纯粹的单机游戏,没有划分纯逻辑层的动机,所以理应独立运行的帧事件也寄宿于Playable中了,阿弥陀佛。
速度控制
对比上图,前者为纯匀速,后者为加入了速度变化的效果,以此增添更强的节奏感。当然其实纯匀速的效果也并不差,在多数游戏估计就这么行了,毕竟动画制作时关键帧之间的插值也不是线性的,本身就具有节奏感。但我选择开发了速度变化功能以此兜底,之所以不选择回到DCC重修动画,一来这样工作流比较折腾,其次实际演出是很综合性的结果,孤立的调整动画很难找到那种感觉,且不同的演出下哪怕是用了相同的动画,其对于节奏的要求也许也是不同的,故做了这个蓝图节点: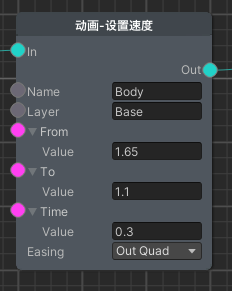
含义非常简单,为某个动画设置起始速度、终点速度、变化时间、插值曲线,产生一段动画速度的插值变化,也可以From, To都填相同的数值实现简单的速度设置。其实这里算是偷懒了,存在一个硬伤:无法实现低-高-低的速度变化,只有从一个值到另一个值,按理来说为此应该使用AnimationCurve实现,但其缺点为难以拉出比算法强的曲线,但可开发配套工具利用算法生成,这个纳入日后的待办事项吧。
除此之外速度相关的还有与具体属性绑定的蓝图节点,根据属性影响动画速度,与速度变化是相乘关系: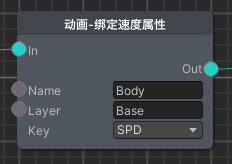
如上图所示般,攻击动画绑定了攻速属性,将受攻速影响:
当然要注意攻击特效的播放速度也得跟随动画速度,所以也会提供相关获取播放速度的API以供外界调用:
|
|
可以看出动画方案将速度分成了三层:总速度(影响全局)、属性速度(影响Layer)、变化速度(Layer之下),借助Playable Graph的特性,输入源的速度可影响下层的速度,且彼此的数值管理独立,分别将属性速度与变化速度存于不同的Playable中,满足功能需求。
|
|
若是改为AnimationCurve的方案则不能用Tween了,得根据播放时间采样对应曲线上的值,当然那是后话了——
暂停控制
如上两图所示,动画播放因为业务的原因(卡肉、硬直)会陷入一段时间的暂停。本来这块对外提供个暂停接口再实现相关业务即可,但想到若是要兼容多种暂停的情况势必得开发个暂停管理层,那干脆将相关业务直接写进AnimMachine好了:
|
|
由于卡肉属于单位全局性的暂停,所以交给其他组件负责,AnimMachine作配合即可。硬直方面则通过在外界启动lagTimer进行控制,再配合isPaused变量作一般功能性的暂停控制。
AvatarMask
AvatarMask,Unity提供选择某些部位执行动画的方案,在Playable API下依旧存在。与Animator那样Layer绑定特定AvatarMask不同,在本方案下是根据蓝图节点自由设置的,可随时切换: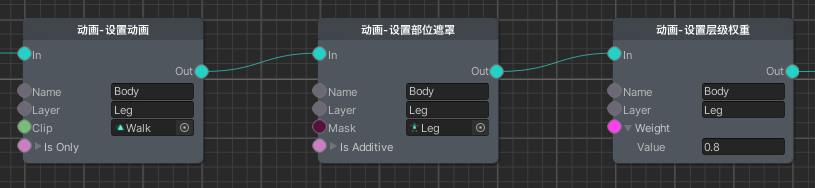
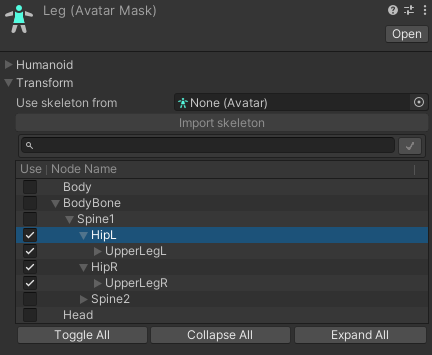
在转转时移动播放此动画,通过AvatarMask使得只有腿部骨骼生效,即可实现上半身攻击下半身走路的效果。且设置权重值为0.8,产生与本体动画的混合感。
特色用法
除了以上专门功能外,还有一些特色用法值得说说。这下真是最后一段了,拖太长了。
单帧设置
如上图所示,其朝向鼠标指针的转向其实也是个动画:
它本质上是个由0-360帧组成对应0-360度转身的功能性动画,这样的动画自然是不能直接播放的,反而需要设置单帧固定好:
|
|
然后通过鼠标指针与单位的相对角度转换为帧时间设置,且为转向动画使用专门的AvatarMask,即可实现跟随鼠标转向的效果了。
部件动画协同

这样看似简单的跑步动画实际上是由两个动画组成的,本体与部件:
这么做是为了通用性,跑步动画是所有单位皆可使用的,所以为了在此基础上加料就得单独做个动画,最后组合起来播放: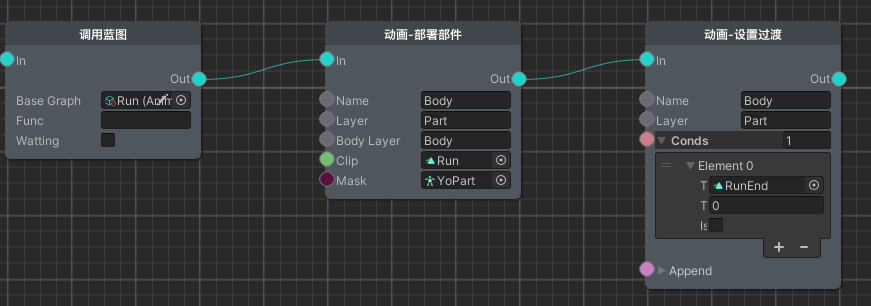
如上图所示,为了省事专门开发了部署部件的蓝图节点,在调用通用跑步的动画蓝图后,Part层对Body层的设置进行了继承,并播放了专门的部件Clip配合相关AvatarMask,并且部件动画之间也有自己的过渡关系:
|
|
组合动画
如上图所示,像这种由多个部件组合而成的流程动画控制也是交由本动画方案实现的,毕竟AnimationClip可不只是骨骼动画。为每个子GameObject标注为动画实体,通过动画蓝图统一调度: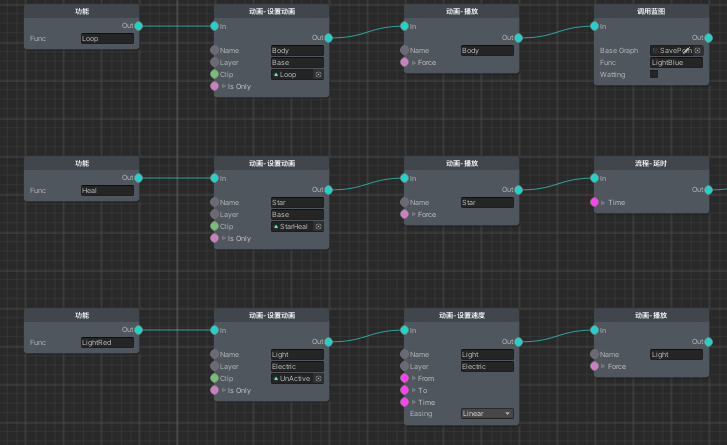
后记
总算是写完了,本篇文章断断续续写了好几天(属实是拉了),光是配图都配了41张。难免会有割裂之处,还请谅解。由于与业务深度捆绑,也不便作个开源版本,大伙便从这只言片语中看个思想,也算作为Unity动画方案的一种思路吧。